31 December 2011

Miscellaneous art

And the last one for now...some miscellaneous art.
These first two are a clipboard I decorated for my daughter to use at school.

To make a decorated clipboard, choose scrapbooking paper you like that works.  This clipboard used four different papers.  For the back, I cut elements I liked from the papers and rearranged them to my liking.  Attach the paper using Mod Podge, smoothly out any bubbles.  I found that some bubbles remained but they flattened out after drying.  For the hearts and name, I used my trusty Cricut.
I then used a craft file to clean up the edges of the clipboard.  Then I painted the edges to give them a clean look.  Next, I painted the clip using acrylic paint and sealed it.  Finally, I attached coordinating ribbons to the hole in the clip by knotting it.  And there you have it!

Back

Front
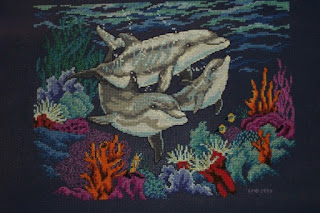
 This is a cross-stitch I did back in 1999.
 I did this cross-stitch for my daughter's bathroom (rubber ducky and sea theme).
 This is a diaper cake I made for a baby shower.

To make a diaper cake, roll diapers and secure with rubber bands.  Arrange the bottom layer by surrounding an 8oz baby bottle with the diapers and secure with a ribbon.  I also included the bottle of soap in the bottom layer.
Arrange the second layer in the same manner using the top of the 8oz bottle as the center.  It's hard to see, but I secured the middle layer with a second, coordinating ribbon.
Arrange the top layer around a 4 oz bottle and secure with ribbon.  I topped the cake with a toy that I secured to the top of the 4 oz bottle with rubber bands.  Finally, I rolled up washcloths and stuck them in between diapers throughout the cake and attached another toy and pacifiers to the cake with rubber bands.
 These next four pictures are a piece titled "Balancing Act."  It was for a creative experiences class I took where we had to create "garbage art", using things that would be thrown away, etc.  It depicts a woman holding a baby, a stack of school books, bills, with a pot boiling on the stove in the background.  Her hobby, painting, is on the back burner of the stove.  The flower represents her love life.  Her hair is in curlers and she is still in her pink fuzzy slippers.


 This last one was a Halloween decoration.  I took an old book and cut ghosts from a page and folded them up so they look like they are coming from the book.  I actually got this idea from an article in Better Homes and Gardens.

Curtains!

Here are some curtains I've made throughout the house.  It is important to note that I did not use a pattern.  In fact, I do not actually know how to sew, really.  I was just "winging it" and hoping the results would be good enough to cover a window in the house.  All of these were also lined, except for the guest room curtain.
Bedroom curtain (two long pieces with short valance in the middle)

Guest room curtain (hung from an oar and tied back with rope on a cleat to go with the nautical theme)

Living room curtains

Valance in my daughter's room

And more artwork!

Here are some things I've painted around the house...
These first two were holders I painted that I hung my daughter's diaper stacker from.  Now, they hold her various beaded necklaces from parades and scarves.


 This next one is in my daughter's bathroom and holds her robes and hand towels (there are actually two with the same painting).
 And this last one is in the master bath for hanging my robe and bath caddy (again, there are actually two).
All of these were painted on decorative curtain holders that were left behind by the previous owners of the house we owned in Florida.  Re-purpose baby!

More artwork

Here are some other random acts of art that I've committed...

Pencil (Final product with colored pencil)

Pencil/colored pencil

Update and Mini Perfume Collection

So, it has been forever since I've been able to add anything new here.  That last semester was a killer, but I managed to maintain an A in every class!  Whew!  I am still planning on uploading my artwork, so stay tuned.  For now, I've decided to throw an idea out there.

I love mini bottles of perfumes and have always looked for a way to not only display the collection, but make it easily accessible.  Solution:  find an old typesetter's case at an antique store and mount it to the wall using little mounting brackets.  Mine is in my bathroom next to the vanity where I get ready in the morning.


And there you have it!  Stay tuned...I'll try to update not only my ideas like this, but the artwork, too!

13 July 2011

Finally! A Manual for Babies!

For a class I'm taking, I had to create an experimental piece of writing.  After my daughter was being particularly bratty one night, I came up with the idea of writing a baby manual.  Here is the proposed diagram for said manual.

07 July 2011

School Daze

I would eventually like to get all of the random acts of art that I have committed uploaded here.  I would even like to say that someday, I may find the time and energy to produce a certain type of art for sale.  Then again, that sounds like a lot of work.  So I guess the baby steps of uploading pictures is a big enough goal for now.

Here are some pieces from school (high school and military training).
NOTE:  Please remember these (while crude) are my own works of art.  Please do not use or copy (the art or photographs) for any purpose without permission from yours truly.  Grazie!

Acrylic

Acrylic

Pencil

Ink Stipple

Pencil

06 July 2011

Bio Poem

Crazy busy with school work! The last semester was a killer, but this next one is proving to be pretty fun! This is a class project I'm presenting on Monday. Let me know what you think!

Bio Poem

16 June 2011

Papers, papers, and more papers!

So, I am drowning in papers for school.  And, I am somewhat surprised to report, they are not writing themselves.  If that doesn't change soon, I may have to (*gulp*) take matters into my own hands.  Pray for me, please.

06 June 2011

Operation Fruit Bowl Complete! (For now)

The last addition to the bowl was an egg.
The pattern can be found here.
I will try to get a picture of the full bowl uploaded soon.  And I do plan to add some more, I just don't have the right yarn or patterns yet.  Besides, on to other projects, such as...school.  Blech.

Alex got out of school over a week ago, and I started last week.  No fun!  So I am hoping this blog will give me much needed breaks from reading and writing papers.  Any projects will have to be quite small unfortunately.  :o(

Anyway, I don't know what will come next.  So stay tuned and thanks for all the e-mails and notes I've gotten with great comments!

27 May 2011

Operation Fruit Bowl Continued

Almost to capacity on the fruit bowl!  Added in some great little nuggets over the past two days.  We now have cherries,
a mushroom,
and a radish.
Here are the patterns for the cherries, shroom, and radish.

24 May 2011

Operation Fruit Bowl Number...Something

So, I can't keep track of numbering the items going in the bowl.  And I'm going to post individual pics of the projects since the bowl is filling up and it's getting harder to see what's in there!  Today, I added a strawberry!

The pattern can be found here.  Eventually, I will upload pics of all (or maybe most) of my FOs (finished objects) because I've been working on some very cool variations of this juicy little berry.

23 May 2011

Operation Fruit Bowl V, VI, and VII

And the newest additions to the bowl: A lemon,
a lime,
and an acorn.
Here are the patterns for the lemon/lime and the acorn. Thank you Peachcake Knits and Carmen Rigby!

21 May 2011

Operation Fruit Bowl (III and IV)

Over the past two days, I did manage to knit up fruits III and IV for the fruit bowl...a pear
and a nanner!
Now I get to knit up some tiny stuff!  :o)
Here are the patterns for the pear and banana, again from Peachcake knits.

20 May 2011

Operation Fruit Bowl (Kinda)

Alright, I have this bowl on my kitchen table.  Very pretty...and very empty.  For Easter, it was full of eggs (Buona Pasqua!).  I was trying to figure out what to put in there for "ordinary days."  I had a giant olive I had knit, so I threw that in there.

Which looked a little lonely...and pathetic.  Surprisingly, vase fillers are apparently very popular right now.  Saw all sorts of junk you could throw in vases and bowls...cherries, lemons, limes, glass beads, potpourri, etc.  One little box of these doo-dads runs anywhere from 5-10 bucks.  Whatevah!
Anywhoop, I was knitting an apple for my daughter's teacher and thought, why not knit up a bunch of fruit?  So I knit an extra apple and chucked it in there, too!
Considering the olive (my fav), I figured I don't need to stick to fruit (hence the "kinda").  I'm hoping to have the time/energy to add something each day.  We'll see.
Here is the pattern for the olive and apple, if you're interested.

Seedy Cables Scarf

For those of you who knit...here is my very first pattern!  It can also be found on Ravelry.
Seedy Cables Scarf

Materials:
Red Heart Super Soft (Worsted weight) - Off White (1.5 – 2 skeins)
U.S. size 8/5 m.m. straight needles
Stitch markers
Cable needle
Row counter (optional)
Tapestry needle

Abbreviations:
Co = Cast on
Sts = stitches
K = knit
P = purl
Sl = slip
Cn = Cable needle

Size:
One size fits all...you can make it as long as you like.

Pattern:
Co 52 sts.

Work 8 rows in seed stitch pattern (see seed stitch pattern below).

NOTE:  The body of the scarf is worked in blocks of 8 rows.  Row 1 sets the pattern.

Row 1:  *Work 8 sts in seed stitch pattern (See seed stitch pattern, row 1, below).
Place marker.
Work 14 sts in wide cable pattern (See wide cable pattern, row 1, below).
Place marker.
Repeat from * once more.
Work 8 sts in seed stitch pattern (See seed stitch pattern, row 1, below).
Row 2:  Repeat 8, 14, 8, 14, 8 sts pattern set above using row 2 of the seed stitch and wide cable patterns below.  Continue in this manner through row 8.

Start back at Row 1 above and continue working in blocks of 8 rows until your scarf reaches the desired length.

After last block of 8 rows, work 8 rows in seed stitch pattern only.

Finishing:
Bind off loosely and cut yarn leaving a 6-inch tail.  Weave in all yarn ends using tapestry needle.

Seed stitch Pattern:
Rows 1, 3, 5, and 7:  *K1, P1; repeat from *.
Rows 2, 4, 6, and 8:  *P1, K1; repeat from *.

Wide Cable Pattern:
Row 1:  P5, sl 2 to cn and hold in back, K2, K2 from cn, P5.
Row 2:  K5, P4, K5.
Row 3:  P4, sl 1 to cn and hold in back, K2, K1 from cn, sl 2 to cn and hold in front, K1, K2 from cn, P4.
Row 4:  K4, P2, K2, P2, K4.
Row 5:  P3, sl 1 to cn and hold in back, K2, K1 from cn, P2, sl 2 to cn and hold in front, K1, K2 from cn, P3.
Row 6:  K3, P2, K4, P2, K3.
Row 7:  P2, sl 1 to cn and hold in back, K2, K1 from cn, P4, sl 2 to cn and hold in front, K1, K2 from cn, P2.
Row 8:  K2, P2, K6, P2, K2.

18 May 2011

If I Only Had a Blog

So I thought I would set up a blog.  Not really sure why yet and not sure I'll ever know.  Just seemed like a good idea at the moment for posting knitting patterns (should I ever get around to writing the ones twittering around my cluttered mind), thoughts, and art projects.  Maybe a new way of keeping people persons up on what I'm up to so they can (hopefully) keep up.  Whatever.  It's here, it's queer, get used to it.