06 February 2012
I'm on Bloglovin'!
Hey you guys! In addition to following through Google Friend Connect, you can now follow me through Bloglovin' too! Just clickety click the Bloglovin' button over there ---------------------------------------->
31 January 2012
Wicked Spongicure
If you've seen my other blog, Adventures in Mani-land, you know I've been swatching my meager little nail polish stash. I've recently
acquired two Icing colors. I'll leave the reviews on those to the
swatch post, but I was noticing how the green sparklies in Witch's Brew
were similar to the sparklies in Evergreen. I thought they may make an
interesting spongicure, so I went with it. Now, this was my first time
sponging, so be kind. HOWEVER, I had a stroke of genius...at least to
me!
I have read dozens and dozens of posts about sponging. All of them said they use make-up sponges and even cut up kitchen sponges. Well, I didn't have any make-up sponges as I don't wear foundation very often and when I do, it's just a sheer powder. And I really wasn't up for cutting up a kitchen sponge. So I had to figure out another option, when it dawned on me that I have a whole package of tiny little eyeshadow applicators. I figured they should do the trick AND be less messy due to their compact size. As I said, I've never done this before, so I cannot attest to whether or not this method is easier. But I can say that it seemed quite easy to me, even as a newbie, and the mess was minimal.

On to the mani! I started with two coats of Icing's Evergreen, followed by SH Insta-Dri. Then I sponged on Icing's Witch's Brew using the eyeshadow applicator, followed by another coat of SH Insta-Dri. What do you think? I'm thinking not too bad for my first time. And I've gotten tons of compliments today! :oD


10 January 2012
Oz-olutely Fabulous Mani
So, I have been seeing a lot of Wizard of Oz products lately (bookmarks, shoes, etc). Since I really love the striped stockings with the ruby slippers, I thought it would be fun to try to do a mani with the same look. Now, this was my first attempt at striping. Manis are rare for me. I'm so rough on my hands that they don't usually last very long so it is usually a one color slap-on mani. But I had a lot of fun, and I WILL master and refine this in time! Anyway, here you have it.
I started with two coats of OPI's Alpine Snow. The stripes were done with China Glaze's (CG) Liquid Leather. And the tips are OPI's Speak for Your Elf. Top coat was Seche Vite (SV). The pics aren't great, but then, neither is my PhD camera. And the pics do NOT do the Speak for Your Elf justice...it's gorgeous!!!


 Sorry the last pic was blurry. Didn't catch it until I uploaded. I would like to do more manis and upload them, so stay tuned for more Adventures in Mani-land!
I started with two coats of OPI's Alpine Snow. The stripes were done with China Glaze's (CG) Liquid Leather. And the tips are OPI's Speak for Your Elf. Top coat was Seche Vite (SV). The pics aren't great, but then, neither is my PhD camera. And the pics do NOT do the Speak for Your Elf justice...it's gorgeous!!!


02 January 2012
Floating Book Bookshelves
Here is something I have done in my house for many years. Thought I would share.
I have some old books from my days as a paralegal. I really liked the way they looked and wanted to incorporate them into my decor. In our last house, I arranged them along the plant shelves and placed various objects on and around them. But, of course, that wasn't good enough!
So, I decided to create shelves. To do this, I got four L-brackets (two for each shelf). I measured the book that would be on the bottom and attached the L-brackets to the wall so that each one would be about two inches in from the edge of the book. Be sure to use anchors as the books are heavy and you will probably want to put things on your new shelf, so you must account for the total weight.
Next, place the bottom book on the L-bracket so that the bracket is between the back cover and last page. Then, use glue or double-sided tape to attach the back cover to the last page, thus hiding the bracket from view. Stack the rest of your books and you're done! The books I used had volume numbers on the spine and the volume numbers are all significant to me. Fun little secret to the display!

 |
| Tried to take a picture showing the L-bracket. |
Wine bottle light
Here is something I did over the holiday. After finishing off a bottle of wine (no, not in one sitting), I decided I really liked the bottle and did not want to get rid of it. So I decided to use it as a candle holder. Of course, that wasn't good enough.
So, using a drill bit for drilling holes in glass, I drilled a 1/4" hole in the back of the bottle about 1" from the bottom. To do this, wear safety glasses and get a helped to slowly pour water on the spot where you are drilling (I used a turkey baster and cup of water to do this). This will keep the glass cool to prevent it from shattering. After the hole is drilled, rinse the bottle to remove bits of glass and allow to dry thoroughly.
Buy a short string of lights (mine was a 35 light string) and feed it through the hole. Use a crochet hook to catch the lights from the top of the bottle to help arrange and evenly distribute the lights. Top with a candle and you're done! The lights I used here do tend to heat the glass a bit, so be careful handling. I made a second bottle for my mother-in-law using mini LED lights that were battery operated. Not as bright, but the glass doesn't heat up either.

31 December 2011
Miscellaneous art
And the last one for now...some miscellaneous art.
These first two are a clipboard I decorated for my daughter to use at school.
To make a decorated clipboard, choose scrapbooking paper you like that works. This clipboard used four different papers. For the back, I cut elements I liked from the papers and rearranged them to my liking. Attach the paper using Mod Podge, smoothly out any bubbles. I found that some bubbles remained but they flattened out after drying. For the hearts and name, I used my trusty Cricut.
I then used a craft file to clean up the edges of the clipboard. Then I painted the edges to give them a clean look. Next, I painted the clip using acrylic paint and sealed it. Finally, I attached coordinating ribbons to the hole in the clip by knotting it. And there you have it!
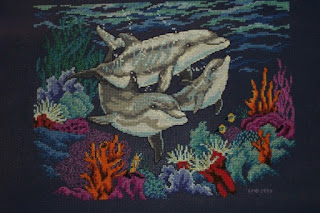
This is a cross-stitch I did back in 1999.
 I did this cross-stitch for my daughter's bathroom (rubber ducky and sea theme).
 This is a diaper cake I made for a baby shower.
To make a diaper cake, roll diapers and secure with rubber bands. Arrange the bottom layer by surrounding an 8oz baby bottle with the diapers and secure with a ribbon. I also included the bottle of soap in the bottom layer.
Arrange the second layer in the same manner using the top of the 8oz bottle as the center. It's hard to see, but I secured the middle layer with a second, coordinating ribbon.
Arrange the top layer around a 4 oz bottle and secure with ribbon. I topped the cake with a toy that I secured to the top of the 4 oz bottle with rubber bands. Finally, I rolled up washcloths and stuck them in between diapers throughout the cake and attached another toy and pacifiers to the cake with rubber bands.
 These next four pictures are a piece titled "Balancing Act." It was for a creative experiences class I took where we had to create "garbage art", using things that would be thrown away, etc. It depicts a woman holding a baby, a stack of school books, bills, with a pot boiling on the stove in the background. Her hobby, painting, is on the back burner of the stove. The flower represents her love life. Her hair is in curlers and she is still in her pink fuzzy slippers.


 This last one was a Halloween decoration. I took an old book and cut ghosts from a page and folded them up so they look like they are coming from the book. I actually got this idea from an article in Better Homes and Gardens.

These first two are a clipboard I decorated for my daughter to use at school.
To make a decorated clipboard, choose scrapbooking paper you like that works. This clipboard used four different papers. For the back, I cut elements I liked from the papers and rearranged them to my liking. Attach the paper using Mod Podge, smoothly out any bubbles. I found that some bubbles remained but they flattened out after drying. For the hearts and name, I used my trusty Cricut.
I then used a craft file to clean up the edges of the clipboard. Then I painted the edges to give them a clean look. Next, I painted the clip using acrylic paint and sealed it. Finally, I attached coordinating ribbons to the hole in the clip by knotting it. And there you have it!
 |
| Back |
 |
| Front |


To make a diaper cake, roll diapers and secure with rubber bands. Arrange the bottom layer by surrounding an 8oz baby bottle with the diapers and secure with a ribbon. I also included the bottle of soap in the bottom layer.
Arrange the second layer in the same manner using the top of the 8oz bottle as the center. It's hard to see, but I secured the middle layer with a second, coordinating ribbon.
Arrange the top layer around a 4 oz bottle and secure with ribbon. I topped the cake with a toy that I secured to the top of the 4 oz bottle with rubber bands. Finally, I rolled up washcloths and stuck them in between diapers throughout the cake and attached another toy and pacifiers to the cake with rubber bands.


Curtains!
Here are some curtains I've made throughout the house. It is important to note that I did not use a pattern. In fact, I do not actually know how to sew, really. I was just "winging it" and hoping the results would be good enough to cover a window in the house. All of these were also lined, except for the guest room curtain.
 |
| Bedroom curtain (two long pieces with short valance in the middle) |
 |
| Guest room curtain (hung from an oar and tied back with rope on a cleat to go with the nautical theme) |
 |
| Living room curtains |
 |
| Valance in my daughter's room |
Subscribe to:
Posts (Atom)